Assignment 4: Cache Lab (due on Thu, Mar 26, 2026 at 11:59pm)
Introduction
This lab will help you understand how cache memories work. You will write about 200-300 lines of C code (not C++!) to simulate the behavior of a cache system for a given sequence of memory accesses (which we call a “trace”).
Initially, we recommend that you implement the cache system for a single core (to obtain the first 4/5 points). Then, you should extend your implementation to handle multiple cores, each with its own cache (to obtain the remaining 1/5 points).
Input Trace Files
The traces directory contains a collection of reference trace
files that we will use as input to evaluate the correctness of your
cache simulator. The trace files are similar to those generated by
a Linux program called valgrind. For example, typing
valgrind --log-fd=1 --tool=lackey -v --trace-mem=yes ls -l
on the command line, valgrind runs the executable program ls -l,
captures a trace of each of its memory accesses in the order they
occur, and prints them to stdout.
Memory traces have the following form:
I 0400d7d4,8,0
 M 0421c7f0,4,0
 L 04f6b868,8,0
 S 7ff0005c8,8,0
Each line denotes one or two memory accesses. The format of each line
is [space]operation address,size,core.
- The operation field denotes the type of memory access:
Idenotes an instruction load,La data load,Sa data store, andMa data modify (i.e., a data load followed by a data store). - There is never a space before an
Ibut there is always a space before eachM,L, andS(this is important to parse these files). - The
addressfield specifies a 64-bit hexadecimal memory address. - The
sizefield specifies the number of bytes accessed by the operation. - The
corefield specifies which core performed the operation.
Missing Parts of the Cache Simulator and Reference Implementation
We already implemented for you the part of the simulator that:
- Receives the command line arguments (
arguments.c); - Parses the input lines of a trace (
csim.c).
Your goal is to:
-
Define your data structures in
cache.hto represent a cache system (e.g., multiple caches, each cache with multiple sets, each set with multiple lines, each line with its metadata); - Implement the missing functions in
cache.cto allocate/deallocate these data structures and to simulate a memory access. Simulating a memory access means:- Searching in the cache to see if it has the data for the given address:
- If it does, you should log that there was a hit by calling
stats_log(stats, EVENT_HIT, core); - Otherwise, you should log a miss by calling
stats_log(stats, EVENT_MISS, core); - In case of miss with eviction, you should also invoke
stats_log(stats, EVENT_EVICTION, core).
- If it does, you should log that there was a hit by calling
- Updating the metadata of the cache (e.g., after a miss, a line will modified to set its tag to that of the memory address, so that the next access will be a hit).
- Note that you are not simulating the actual data transfers, only the updates to the metadata.
- Searching in the cache to see if it has the data for the given address:
- Implement the missing parts in
csim.cthat handleL,S,Maccesses found in the trace.
By running make you will obtain your compiled simulator in ./bin/csim.
You can run this simulator on simple traces to verify is output; we recommend that you start with the simple trace ./traces/simple_direct.trace.
To let you know the expected output, we have also provided a complete
implementation of the simulator in ./csim-ref (of course, without its source code).
Both simulators take the same command line arguments:
./csim-ref [-hv] -C <C> -S <S> -K <K> -B <B> -p <P> -t <tracefile>
-h: Optional help flag that prints usage info-v: Optional verbose flag that displays trace info-C <C>: Number of cores (in the traces, cores are numbered starting from 0)-S <S>: Number of sets ($s = \log_2(S)$ is the number of bits used for the set index)-K <K>: Number of lines per set (associativity or number of ways)-B <B>: Number of bytes per line ($b = \log_2(B)$ is the number of bits used for the byte offset within the line)-p <P>: Selects a policy, eitherLRUorFIFO-t <tracefile>: Name of the valgrind trace to replay
The command-line arguments are based on the notation (S, K, B)
from page 617 of the CS:APP3e textbook:
For example, you can start the reference cache simulator like this:
$ ./csim-ref -C 1 -S 16 -K 1 -B 16 -p LRU -t traces/yi.trace
hits:4 misses:5 evictions:3 remote_invalidations:0 remote_writebacks:0
The same example in verbose mode annotates each memory access with additional information with the format n:event where n is the core number and event is a cache event such as hit, miss, eviction (initially, for a single-core cache, ignore remote_invalidations and remote_writebacks):
$ ./csim-ref -C 1 -S 16 -K 1 -B 16 -p LRU -v -t traces/yi.trace
L 10,1,0 0:miss
M 20,1,0 0:miss 0:hit
L 22,1,0 0:hit
S 18,1,0 0:hit
L 110,1,0 0:miss 0:eviction
L 210,1,0 0:miss 0:eviction
M 12,1,0 0:miss 0:eviction 0:hit
hits:4 misses:5 evictions:3 remote_invalidations:0 remote_writebacks:0
Unit Tests
We have prepared for you simple unit tests to fix the initial bugs that your implementation may have.
To run all the tests (recompiling if necessary, in debug mode), use make test
To compile the project but run only a specific test, for example test_cache_single_core.c, you can use
$ make
$ ./bin/test_cache_single_core
If the test fails, you can CTRL-click (Windows) or CMD-click (macOS) in the VS Code terminal to go to the assertion that wasn’t satisfied:

To quickly debug a test, you can use gdb in VS Code’s terminal (since this is C, you’ll use n instead of ni):
$ gdb bin/test_cache_single_core
(gdb) layout src
(gdb) b test_cache_allocate_deallocate
(gdb) run

You can also use the VS Code debugger! We have already prepared “debug profiles” for test_cache_single_core, test_cache_multi_core, csim inside .vscode/launch.json. So, you can set breakpoints and start the VS Code debugger with the “play button” (top left of the screenshot):

To debug csim with specific command line arguments, you need to edit the following line of .vscode/launch.json:
"args": ["-C", "1", "-S", "8", "-K", "1", "-B", "1", "-p", "LRU", "-t", "traces/simple_direct.trace"],
Where to Start
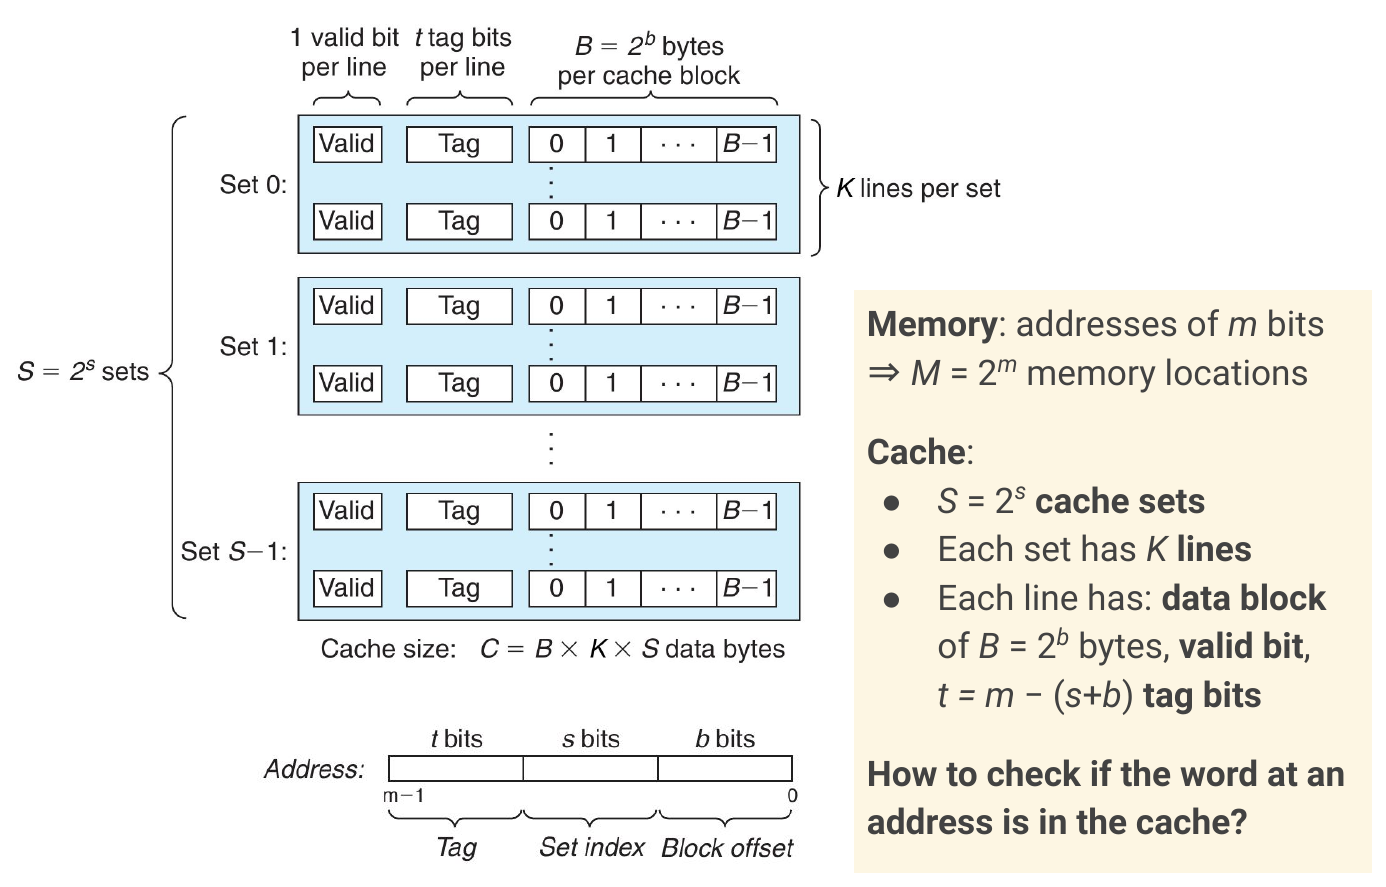
-
Review cache organization, in particular “set associative caches” and how a memory address is split into
tag | set_index | block_offsetand used to search for the corresponding memory block in the cache. -
Read the comments and tips that we left in the source code!
-
Design the data structures for your cache (likely, some
structwith pointers to arrays allocated usingmalloc). Friday’s discussion on CacheLab should help with this. - Initially, we recommend that you skip implementing eviction policies (just evict the first cache line), accesses to ranges of memory addresses (instead of a single address), multicore caches (just allocate one cache in the
CacheSystem).- If you get the main set-associative cache implementation right, you should be able to obtain 1/5 points with
./grade(passing the grading tests intest/grading/direct.sh) and also to pass many (but not all) unit tests intest/test_cache_single_core.c.
- If you get the main set-associative cache implementation right, you should be able to obtain 1/5 points with
-
Then, implement FIFO/LRU eviction policies (it should be a small change to your data structures and program logic). After this, you should be able to obtain 3/5 points with
./grade. -
Then, implement the function
access_rangeincsim.c. After this, you should be able to obtain 4/5 points with./grade. - Finally, you should modify your implementation to record remote invalidations and writebacks due to the cache coherence protocol. The main ideas are the following:
- If a CPU core reads a memory block and loads it into its cache, other cores should:
- Do nothing, if they don’t have the block, or they have it but without local changes.
- Write back the block to L3 cache, if they have made local changes (the line state will change from M to S).
- If a CPU core writes to a memory block, other cores should:
- Do nothing, if they don’t have the block.
- Write back the block to L3 cache, if they have made local changes.
- Invalidate the block, irrespective of whether they have made local changes or not (the line state will change from M or S, to I).
- For invalidations, you should modify the state of lines in the caches of other cores; for writebacks, you don’t need to simulate the L3 cache, you can just “count” how many writebacks would happen and update the state of lines in the caches.
- If a CPU core reads a memory block and loads it into its cache, other cores should:
Checking Your Grade
To check your grade on all traces (recompiling if necessary, in release mode), use ./grade
The grading script will run your cache simulator using different test suites:
- Direct Mapped (1 point): These tests use only one line per set ($K=1$), so that all eviction policies are equivalent (you don’t even need to implement a policy to pass these tests).
- Policy Tests (2 points): These tests check that your LRU and FIFO policies work correctly.
- Size Tests (1 points): These tests include memory accesses that
can cross a line boundary. For example, if your cache lines are 4
bytes, reading 4 bytes from
0x2will generate two memory accesses (to the block0x0-0x3and to the block0x4-0x7). For these tests, you need to take into account thesizefield ofvalgrindtraces. - Multicore Tests (1 points): These tests include memory accesses that
are generated by different cores. To pass these tests, you need to simulate the effects of the cache coherence protocol; specifically, you need to log the
REMOTE_INVALIDATEandREMOTE_WRITEBACK. For example, if core 0 reads from0x2and then core 1 writes to the same address0x2, the block at core 0 must be invalidated. Or, if core 0 writes to0x2and then core 1 reads from the same address0x2, the block at core 0 must be written back to L3.
You must pass all tests in a test suite to receive its points. The output will show you which trace and command line arguments resulted in wrong outputs:
$ ./grade
==
>> Running 'direct' tests ... FAILED
./bin/csim -C 1 -S 8 -K 1 -B 1 -p LRU -t traces/simple_direct.trace
EXPECTED: hits:3 misses:3 evictions:0 remote_invalidations:0 remote_writebacks:0
  ACTUAL: hits:0 misses:0 evictions:0 remote_invalidations:0 remote_writebacks:0
==
>> Running 'policy' tests ... FAILED
./bin/csim -C 1 -S 2 -K 2 -B 2 -p LRU -t traces/simple_policy.trace
EXPECTED: hits:3 misses:4 evictions:1 remote_invalidations:0 remote_writebacks:0
  ACTUAL: hits:0 misses:0 evictions:0 remote_invalidations:0 remote_writebacks:0
==
>> Running 'size' tests ... FAILED
./bin/csim -C 1 -S 1 -K 1 -B 2 -p LRU -t traces/simple_size1.trace
EXPECTED: hits:2 misses:6 evictions:5 remote_invalidations:0 remote_writebacks:0
  ACTUAL: hits:0 misses:0 evictions:0 remote_invalidations:0 remote_writebacks:0
==
>> Running 'multicore' tests ... FAILED
./bin/csim -C 2 -S 1 -K 3 -B 16 -p LRU -t traces/simple_multicore1.trace
EXPECTED: hits:1 misses:3 evictions:0 remote_invalidations:0 remote_writebacks:0
  ACTUAL: hits:0 misses:0 evictions:0 remote_invalidations:0 remote_writebacks:0
==
>> SCORE: 0
If a test is not passing, you can use the reference simulator
csim-ref with the -v option to obtain a detailed record of each
hit, miss, eviction:
$ ./csim-ref -C 1 -S 8 -K 1 -B 1 -p LRU -v -t traces/simple_direct.trace
L 0,1,0 0:miss
L 2,1,0 0:miss
L 0,1,0 0:hit
L 2,1,0 0:hit
L 4,1,0 0:miss
L 0,1,0 0:hit
hits:3 misses:3 evictions:0 remote_invalidations:0 remote_writebacks:0
Hand-In Instructions
You must commit and push your files to GitHub. Assignment
collection will be automatic: after the assignment deadline, our
grading system will fetch the most recent commit on the master
branch of your repository.
Be sure to run ./grade to verify your score before the deadline.
If you want to use late days, make a push after the deadline: we will use the push date (not the commit date) to determine your late days.